Instructions for Wear & Care of Custom AFO Gauntlet Brace
Basic instructions for use and care of your AFO Gauntlet
SOCKS
Always wear a clean, non-elastic cotton sock, stocking or similar garment to reduce friction and protect from perspiration. Smooth out any wrinkles. Change socks often to reduce perspiration build up. Using talcum powder may keep you dry and more comfortable.
SHOES
A well-constructed, lace up, Blucher style shoe will provide the best results. Shoes with removable insoles and/or added (extra) depth may be necessary. Maintain consistent heel height when alternating shoes. Irregular wear patterns should be reported to your healthcare provider.
SELF EXAMINATION
Follow proper break-in guidelines. It may take a brief period of time before the orthosis feels natural. A proper fitting AFO exerts a firm, steady pressure against the skin. Extended periods of standing, hot or humid conditions may result in swelling of the leg. If so, remove the orthosis and elevate the leg until the swelling subsides. Extreme fluctuations in weight may cause an improper fit of your orthosis.
Contact our healthcare provider immediately if any of the following occur: Sharp or stabbing pain, prolonged swelling, bruises, callouses or blisters.
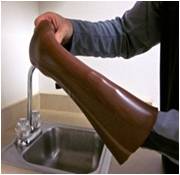
PROPER HYGIENE
Any skin covered by the orthosis should be washed daily with mild soap and warm water. Generous rinsing helps ensure removal of all soap lather. Thoroughly clean the bottom of feet, between the toes and dry the skin completely before wearing your orthosis. You AFO should be cleaned regularly with a solution of 1 part alcohol and 1 part water, applied with a clean towel. Allow to air dry at room temperature. Do not attempt to hasten drying but introduction of an external heat source. Use a quality leather cleaner and conditioner on the outside leather of the orthosis. Worn, cracked or broken portions of your orthosis should be assessed by your healthcare provider and repaired as soon as possible.
Instructions for a Below Knee Prosthesis
The following is a basic guide from Walkabout Orthotics and Prosthetics to help you with your prosthesis. This is not a comprehensive guide and should not be used as a substitute for the instructions of your prosthetist or physician.
A below knee prosthesis will allow you to get back on your feet, but requires determination and hard work. When you come in for an appointment, always have a pair of sturdy shoes (lace-up or Velcro closure are best) and shorts.
A below knee prosthesis is most commonly held on (suspended) by a gel liner with shuttle lock or with a suspension sleeve.
With a prosthesis held on with a gel liner with shuttle lock, there will be a metal or plastic pin in the bottom of the gel liner that clicks into the lock in the bottom of the socket. Once you hear one click, it is safe for you to walk. Do not attempt to walk if the plunger has not engaged into the lock. As you walk and settle into the socket, you will hear a few more clicks. This is a one-way lock and will only release when the button on the side of the socket is pressed and held. If the socket is too loose when you put it on, you will hear several clicks in rapid succession. This means that you need to put on a sock. Socks are put on over the gel liner.
You will probably get two gel liners. Both have plungers that have been loc-tited and tightened into the bottom of the liner. If these ever come loose, please don’t use the loose one until we can loc-tite and tighten it in again. This is rare, but a loose pin can cause the prosthesis to not be secure.
A gel liner should be put on (“donned”) first thing in the morning when you put on your prosthesis. You should not wear the liner without the prosthesis, because if you were to fall on the pin it could hurt your limb. The liner is put on by turning it inside out, flattening the end and then rolling it up on your leg. There should be no wrinkles or air pockets between the liner and your skin. If you wear a liner-liner sock (a thin grey sock) it is worn between your leg and the liner. The gel liner should be cleaned every night by turning it inside out, putting it in the sink, and hand washing it with soap and water. Rinse it very well, turn it right side out and let it air dry overnight. A clean liner should be put on every day, or an itchy red rash may develop on your limb. If you have two gel liners, they should be alternated daily to make them last longer. Gel liners will need to be replaced when they wear out.
At first, socket fit should be snug. As you walk, the swelling and fluid in your limb will be pushed up and out of your limb and the socket will become looser. If it is too loose, your limb will “bottom out” and you will feel pain on the bottom of your limb and maybe over your knee cap. You should address this by adding a sock. Your limb should sit in the proper place in the socket and socks will keep your limb from falling down too deep in the socket. This is important because reliefs have been made in the socket for sensitive bones, and if your limb is not in the appropriate place in the socket, these bones will rub on the inside of the socket and cause pain and sores. Socks typically come in three thicknesses- 2 ply, 3 ply and 5 ply. These socks come with holes in the bottom for gel liners with a shuttle lock. Make sure all of the fabric is out of the way of the plunger so that material does not get stuck in the lock. Socks can be layered for desired thickness. Try to use the thickest sock available- for example, instead of using five 2-ply socks, use two 5-ply socks to get 10 ply of thickness. Your limb will shrink as you walk during the day, so you should keep a few socks in your pocket or purse to put on during the day as needed.
If the prosthesis is too tight and won’t go on in the morning, you can put on a shrinker for a couple hours to reduce swelling. You can also try carefully standing in the socket and rocking back and forth, which can push fluid up and out of your limb and allow your limb to settle into the prosthesis. Make sure the plunger is lined up correctly to go into the lock. If the plunger won’t engage in the lock, and especially if you feel the pin pushing back at you, take off the gel liner and re-don it with the plunger pointed toward the lock. If you have a problem with edema (swelling) in general, you should wear a shrinker when not wearing your prosthesis. Your prosthesis may be worn during waking hours, and should be removed for sleeping.
What if I can’t get my prosthesis off? First, be sure that you are holding the release button down while you pull off your prosthesis. If the release button has fallen out and is lost, you can use an allen wrench or screwdriver to push where the button used to be and release the lock. Please come in to see us as soon as possible for replacement of the button. If you wear a gel liner and shuttle lock style prosthesis and you cannot release the plunger from the lock, this is often due to a piece of sock getting jammed into the lock. Sometimes you can fix this by having someone hold down the release button and firmly (but not to hurt you) tug on the prosthesis. If this does not work, you can try working soapy water in-between your leg and the gel liner so that you can slide your leg out of the liner. If this doesn’t work, come in to see us. If this is not possible, you should go to the Emergency Department.
A prosthesis with a gel liner is comfortable and works well, but can be hot in the summer. It is normal to sweat a lot for the first few weeks, but then your body should adjust and the sweating will be much less. Gel liners come very tall and should be cut to length. It should never be cut lower than the trimlines of the socket. They are typically cut straight across with a sharp pair of scissors. You will need to look for any redness or skin breakdown on your limb from walking in the prosthesis. If redness, blistering or a sore develops, call your prosthetist immediately and stop using your prosthesis until we can solve the problem. Common causes of sores are not using
socks when needed or the limb changing shape and not fitting properly in the socket anymore. Please stop walking on the prosthesis and see your physician immediately if a wound has developed. Your limb will change shape over time. This is a normal process. You will probably notice that your limb is very round and swollen when you first start using a prosthesis. As you walk, the swelling is pushed up and out, and your limb will shrink. Also, the muscles below your knee will atrophy some over time. In time, your knee and shin bone will look more prominent and your limb will look more tapered. As this happens, new sockets will need to be made to provide a proper fit.
You should wear sturdy lace-up or Velcro closure shoes with a standard heel height. If you wear shoes with a different heel height, it will throw you forwards or backwards and may cause you to fall.
All prosthetic supplies, including socket changes, socks, suspension sleeves, gel liners, prosthetic feet, covers and skins require a prescription from a doctor. You can have your physician fax an order for these supplies to Walkabout at 715-849-9353.
Most people with a new prosthesis benefit from physical therapy. The physical therapist will do “gait training” to help you learn how to walk well with your prosthesis. The P.T. appointment should ideally start right after you bring your new prosthesis home. You will need a prescription from your doctor for physical therapy. You can see a physical therapist locally. Be sure that the therapist you are seeing has some experience with gait training with a prosthesis.
When we deliver your prosthesis, we will have loc-tited and torqued the appropriate fittings. Please do not make your own adjustments, as the fittings may not be safely tightened afterward. Also, inappropriate alignment changes can make you fall or cause damaging forces on your knee. Please do not grind, cut or otherwise alter your socket. If you need an adjustment, let us do it for you.
Typically, you will be given an appointment to come back for follow-up in about 2 weeks. At that point, we will make any necessary adjustments to the prosthesis. You should certainly come back sooner if any problems develop before then.
A cosmetic/protective cover may be added when the initial adjustments are completed. Once the initial fitting is complete, we will want to see you for any adjustments or repairs, and at least every 6 months to a year.
A prosthesis is made of mechanical parts. As with anything mechanical, it is possible for these parts to wear out or become loose and fail. If you notice that your prosthesis is making a funny noise or “walks” differently, please stop using it immediately and bring it in to be evaluated. You should never walk on a loose or broken prosthesis.
This information is not comprehensive, but intended to give you some basic instructions. If you have questions, please make an appointment to see us or call us.
Sock management
While wearing your prosthesis it is common to experience a loss of volume in the limb throughout the day. This is commonly referred to as “sock management” or “volume management”. As your residual limb loses volume, the space between your residual limb and prosthesis will become greater and must be filled. Your prosthetist will provide you with several socks, of various thickness, that will fill in this space. Sock ply is determined by the thickness of the sock. The sock ply can visually be determined by either a number on the sock or the color of the sock stitching. The lower the sock ply, the thinner the sock. It will be your job to determine when socks are required and what size will best fill in the gap. It takes some time to get proficient with this. Be sure to talk with the prosthetist and physical therapist when you have questions. You will be taught how to manage your sock wear. This skill will be frequently reviewed because it is important in maintaining the fit and function of the prosthesis and health of your residual limb.
Instructions for Cervical Collar Use
Aspen Collar (white plastic/grey liners)
This collar is to be worn at all times except for when showering. To put this collar on, you must be lying down. Slide back piece under head and neck, then place front piece under chin and attached velcro straps on back piece to front piece. There is one strap on each side.
To remove – reverse steps.
Philadelphia Collar (beige collar)
The Philadelphia collar is to be worn for showering. This collar needs to be put on while lying down. Slip back piece under head and neck. Place front piece under chin. Sides of the front piece overlap sides of back piece and are secured with velcro.
To remove – reverse steps.
Instructions for Lumbar-Sacral (LS) Corset
Putting Corset On
Patient must be in lying down position.
Open all straps and laces for corset
Roll patient on their side and drape corset over body. If patient is alone, have patient place
thumb on tag of corset then locate spine with thumb and tag.
Roll patient onto their other side slightly to grab loose end of corset from under body.
Roll onto back.
Position corset bottom at bend of thigh.
Fasten velcro closures bottom to top but do not tighten
Now go back to tighten velcro closures bottom to top
Pull tabs that tighten laces side to side bottom to top
Removing corset
While patient is lying down, loosen velcro closures top to bottom. Loosen each velcro closure a little at a time using 3 repetitions top to bottom. Do not just open velcro.
Care and cleaning for your prosthetic liner
It is very important to clean your limb and liner each evening after wearing your prosthesis. Bacteria or fungus can build up inside the liner and may cause a skin rash or irritation. If you notice any changes with your skin please contact our office.
Step one
Remove your prosthetic liner after you are finished wearing your prosthesis for the day and turn the liner inside out.
Step two
Using Ivory bar soap (no antibacterial), clean the inside of the liner thoroughly. do not use any abrasive materials on the liner it may result in damage to the liner
Step three
Rinse completely and remove all soap residue from the inside of the liner. Any residue left on the liner may cause a skin irritation.
Step four
Dry the inside of the liner completely with a clean towel.
Step five
Turn the liner right side out and either place on a dry stand or lay flat on table
Do not leave the gel side turned inside-out overnight. This will damage the liner
PATIENT PROSTHETIC TROUBLESHOOTING GUIDE
Below is a list of prosthetic questions asked by previous patients. This is intended as a guide. As always, if there is any confusion or additional questions please contact Walkabout Orthotics and Prosthetics (715) 849-8703
What if I cannot get the leg on?
If the prosthesis is too tight and won’t go on for some reason, you can
Put a shrinker on for a couple hours to try and reduce swelling.
carefully try standing in the socket and rocking back and forth, which can push fluid up and out of your limb and allow your limb to settle into the prosthesis. Do not do this too aggressively and always do this with an assistive device (cane, walker, crutches) and have a family member or caretaker present to assist with stability.
If your limb fluctuates in volume (which is not uncommon in the beginning stages of prosthetic use) you should always wear a shrinker at night.
I cannot get the pin lined up into the lock?
Make sure liner is donned correctly. Pin must be in proper alignment to go into lock. Take liner off and reapply.
If the plunger won’t engage in the lock, and especially if you feel the pin pushing back at you, take off the gel liner and re-don it with the plunger pointed toward the lock. If you have a problem with edema (swelling) in general, you should wear a shrinker when not wearing your prosthesis. Your prosthesis may be worn during waking hours, and should be removed for sleeping.
How often should I wear my prosthesis?
During beginning stages and or when you are receiving a new prosthesis you should be conscious of not wearing your prosthesis too often. Be sure to take the prosthesis off (including the gel liner) and look at your skin to insure that there is no excessive redness, irritation, blisters.
I have a water blister on my leg. How did this happen?
Generally this is due to donning the liner incorrectly and trapping air in between the gel liner and your limb. Refer to how to donn a liner correctly guide.
I hear a “clicking” noise when ambulating in my prosthesis. What should I do?
Contact your prosthetist immediately so they may address the issue
I can’t get my prosthesis off?
Be sure that you are holding the release button and keep it held in while you pull off your prosthesis.
If the release button has fallen out in a rare circumstance and is lost, you can use an allen wrench or screwdriver to push where the button used to be and release the lock. Please contact walkabout as soon as possible for replacement of the button.
If you have tried the first two options this is often times due to a piece of prosthetic sock getting jammed into the lock. Sometimes you can fix this by having someone hold down the release button and firmly (but not to hurt you) tug on the prosthesis. If this does not work, you can try working soapy water in-between your leg and the gel liner so that you can slide your leg out of the liner. If this doesn’t work, contact walkabout.
How do I know I have the proper amount of socks on?
Very difficult to judge. When donning the leg you should not be able to “click” all the way down initially if using a pin system. Ideally you should achieve a few clicks when donning and as you walk a couple steps you will click down further all the way into the leg. It is common to add socks throughout the day as fluid is pushed out of the limb
I sweat a lot in my leg. Is this normal?
As a new amputee this is normal. With prosthetic use your sweat glands will reduce in how much they perspire. We recommend Certain-Dri which is an antiperspirant that you can purchase at most convenient stores.
I have a rash on my skin. What is this from?
Could be due to not getting all of the soap off of the liner while cleaning.
Could be due to an allergic reaction to the gel. This is rare and if you had an allergic reaction the whole leg would be irritated.
The leg feels really tight while walking. What does that mean?
Generally this means that you need to add prosthetic socks. Try adding some and this may reduce the pain you are experiencing. We know… This is opposite of what you normally would think of doing.
Can I wear different shoes with the prosthesis?
Yes, but be aware of heel height. I heel height that is too low (similar to wearing flats, or flip flops) can result in you feeling like you are walking “uphill” and a heel height that is too high (often times seen in a variety of women’s dress shoes or work boots) can result in you feeling that you are walking “downhill.” Most heel heights in a variety of men’s and women’s shoes are 3/8” height which is what your prosthesis is built to.
I feel that I need to add a sock but when I do so, it is too tight on the sides by my knee.
Your limb will reduce in volume and the bottom of your leg will reduce more than the top. People often times will cut the prosthetic sock in half (by reducing how long it is having it only go halfway up the leg turning it into a “half sock”). Put the half sock on first followed by a full sock. Example” if eight ply is needed but is too tight on top you can cut a 5 ply in half. Put the 5ply half sock on first followed by a full length 3 ply. This will result in you having an 8 ply fit near the bottom of your leg (3+5ply) and a 3 ply fit on top.
Can I adjust my own prosthesis?
No you cannot. Walkabout assumes no responsibility and all warranties are void if you adjust your prosthesis independently.
Shoe Care Instructions
Break-In Period for Shoes with Heat Molded or Custom Inserts (MEDICARE Covered Inserts)
In order to ensure that your shoes become a functioning extension of your pedorthic medical care, please follow these instructions:
When you arrive home, place your new shoes (with inserts in them) on your feet (with socks) and wear them for 30-60 minutes on carpeting at first.
Remove your shoes and socks and look for any areas of redness on your feet (ask a family member for assistance if necessary)
Once you have verified that the shoes do not rub your skin (absence of redness), wear your shoes around your home for a day or two; check again for areas of redness.
Once you (or your family member) have verified that you are not having problems with these new shoes, you are ready to wear them outside of the house.
Remember, even after this break in period, you should always check your shoes and feet each day looking for anything out of the ordinary.
The Therapeutic Shoe Bill (through Medicare) provides a pair of shoes and three pair of inserts in one calendar year. The typical life span of these inserts is about 4 months. Please remove each insert as instructed every 4 months (mark your calendar) and replace it with the other inserts provided. If used properly, 3 pair of inserts should last one year.
Care of the Shoes (Leather)
Clean your shoes regularly – this will give life back to the leather!
If your shoes are dirty we suggest that you first clean them with a damp cloth to get them ready for the application of shoe crème.
Use a cleaning and conditioning crème for the leather shoes. This crème will keep the leather clean and supple. Leather crème can be found at any drug, shoe or grocery store.
Simply apply crème with a clean dry cloth and work into the leather. Buff or brush out to provide a fresh finish. If needed, a colored shoe crème may also be used.
Care of Shoes (Nubuck)
This material can be cleaned by using the small suede brush at work away the dirt.
Also, there are sprays designed to refurbish suede and nubuck materials (the Kiwi brand works great). Try the spray in a small area first to test for any discoloration.
Do not immerse the nubuck shoes in water. Shoe polish should not be used.
Care of Shoes (Lycra)
Never put this shoe in the washing machine.
We suggest using any fabric protector on this material to help retard the dirt.
Spray the shoes with fabric protect before wearing them regularly.
If the shoes do get soiled, use a small amount of mild dish soap and water – or a small amount of Woolite and water – to remove the dirt (especially on the beige)
Try a baby wipe! (Works great if the shoe has first been sprayed with a fabric protector)

 Step one
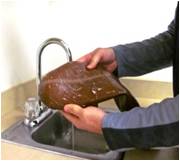 Step two
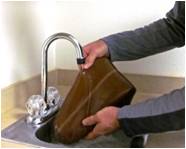 Step three
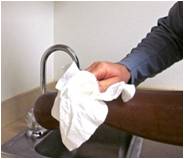 Step four
 Step five